고급 기능 설정
확장팩 설정
정상적으로 설치 후 확장팩 기능을 사용하려면 다음과 같이 설정 파일을 생성하고 에이전트를 다시 시작하세요.
MySQL 서버 목록
MySQL/MariaDB 모니터링 에이전트를 이용할 수 있습니다.
웹 URL 성능 체크
와탭 인프라 에이전트가 주어진 웹 주소로 접속하여 접속 여부 및 응답 시간을 수집합니다. 수집된 웹 URL 성능은 카테고리 server_webcheck에서 확인할 수 있습니다. 다음 명령으로 체크할 웹 주소를 추가하세요. URL 모니터링 서비스에 대한 자세한 내용은 다음 문서를 참조하세요.
- Linux Shell
- Windows Powershell
echo "체크할 웹 주소" | sudo tee -a /usr/whatap/infra/conf/webcheck.conf
echo "webcheck.enabled=true" | sudo tee -a /usr/whatap/infra/conf/whatap.conf
sudo service whatap-infra restart
Add-Content -Path "C:\Program Files\WhatapInfra\webcheck.conf" -Value "체크할 웹 주소"
Add-Content -Path "C:\Program Files\WhatapInfra\whatap.conf" -Value "webcheck.enabled=true"
Restart-Service "Whatap Infra"
Redis 서버 목록
와탭 인프라 에이전트가 주어진 Redis 주소로 접속하여 연결 개수를 포함한 여러 개의 성능 지수를 수집합니다. 수집된 성능 정보는 카테고리 server_redis에서 확인할 수 있습니다. 다음 명령으로 체크할 Redis 서버의 접속 정보를 추가할 수 있습니다.
- Linux Shell
- Windows Powershell
sudo echo "addr=Redis 주소:포트" | sudo tee /usr/whatap/infra/conf/redis.conf
sudo echo "password=Redis 패스워드" | sudo tee -a /usr/whatap/infra/conf/redis.conf
sudo service whatap-infra restart
Add-Content -Path "C:\Program Files\WhatapInfra\redis.conf" -Value "addr=Redis 주소:포트"
Add-Content -Path "C:\Program Files\WhatapInfra\redis.conf" -Value "password=Redis 패스워드"
Restart-Service "Whatap Infra"
Memcached 서버 목록
와탭 인프라 에이전트가 주어진 Memcached 주소로 접속하여 연결 개수를 포함한 여러 개의 성능 지수를 수집합니다. 수집된 정보는 카테고리 server_memcached에서 확인할 수 있습니다. 다음 명령으로 체크할 Memcached 서버의 접속 정보를 추가할 수 있습니다.
- Linux Shell
- Windows Powershell
sudo echo "addr=Memcached 주소:포트" | sudo tee /usr/whatap/infra/conf/memcached.conf
sudo echo "password=Memcached 패스워드" | sudo tee -a /usr/whatap/infra/conf/memcached.conf
sudo service whatap-infra restart
Add-Content -Path "C:\Program Files\WhatapInfra\memcached.conf" -Value "addr=Memcached 주소"
Add-Content -Path "C:\Program Files\WhatapInfra\memcached.conf" -Value "password=Memcached 패스워드"
Restart-Service "Whatap Infra"
TCP 포트 감시
네트워크 데몬의 수신 포트 비활성화 시 알림을 받을 수 있습니다.
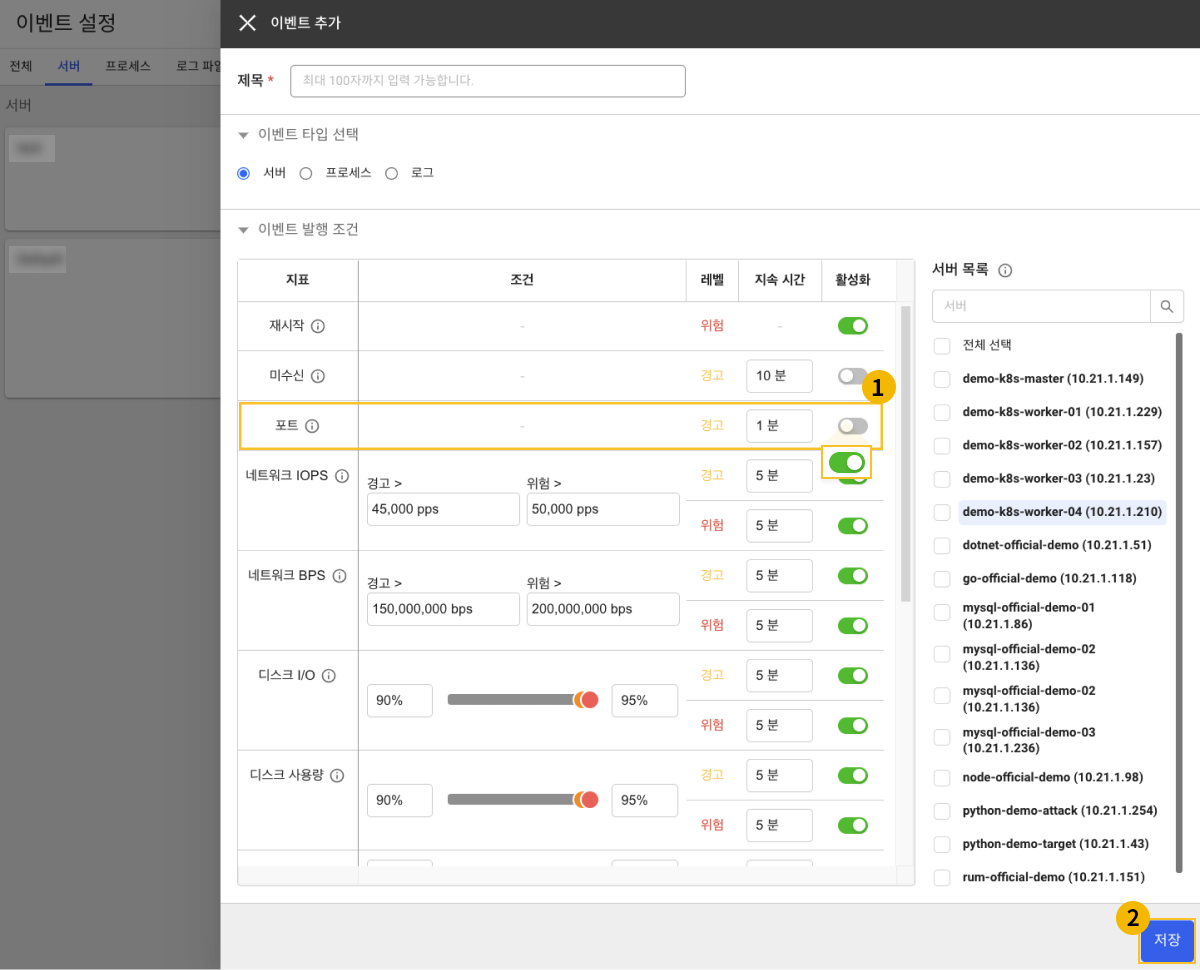
홈 화면 > 프로젝트 선택 > 경고 알림 > 이벤트 설정 > 서버 탭을 선택하고 + 이벤트 추가 버튼을 선택하세요.
-
 포트 지표 토글 버튼을 클릭하여 사용 상태로 변경하세요.
 -
 저장 버튼을 선택하여 저장하세요.
 -
대상 서버에서 다음 명령을 추가하세요.
- Linux Shell
- Windows Powershell
#아래 변수에 모니터링 대상 아이피를 지정합니다.
export TARGET_IP=127.0.0.1
#아래 변수에 모니터링 대상 포트를 지정합니다.
export TARGET_PORT=80
echo "tcp.check.$TARGET_PORT=tcp://$TARGET_IP:$TARGET_PORT" |sudo tee -a /usr/whatap/infra/conf/whatap.conf
#아래 변수에 모니터링 대상 아이피를 지정합니다.
$TARGET_IP="127.0.0.1"
#아래 변수에 모니터링 대상 포트를 지정합니다.
$TARGET_PORT="80"
Add-Content -Path "C:\Program Files\WhatapInfra\whatap.conf" -Value "tcp.check.${TARGET_PORT}=tcp://${TARGET_IP}:${TARGET_PORT}"
다중 포트 감시
여러 개의 포트를 감시하기 위해서는 whatap.conf 파일 내 추가 설정이 필요합니다. 다음 예시를 참고하세요.
# port 8080, port 80
tcp.check.8080=tcp://127.0.0.1:8080
tcp.check.80=tcp://127.0.0.1:80
프로세스 File Descriptor 정보 수집
프로세스 File Descriptor 정보는 서버 목록 > 서버 상세 화면의 프로세스 위젯에서 확인할 수 있습니다.
- Linux Shell
- Windows Powershell
echo "process.fdcheck=true" |sudo tee -a /usr/whatap/infra/conf/whatap.conf
# 관리자 권한이 필요합니다.
Add-Content -Path "C:\Program Files\WhatapInfra\whatap.conf" -Value "process.fdcheck=true"
서버 스펙 수집
CPU, MEMORY, DISK, NIC의 스펙과 설치된 패키지 및 가상 머신의 메타 정보를 수집합니다. 각 카테고리에서 다음 내용을 확인하실 수 있습니다.
server_package: 설치된 패키지입니다.server_inventory: CPU, MEMORY, DISK, NIC의 스펙입니다.server_pending_security_update: 리눅스의 보안 패치 대기 목록입니다.
- Linux Shell
- Windows Powershell
echo "inventory.product.enabled=true" |sudo tee -a /usr/whatap/infra/conf/whatap.conf
# 관리자 권한이 필요합니다.
Add-Content -Path "C:\Program Files\WhatapInfra\whatap.conf" -Value "inventory.product.enabled=true"
리눅스 컨테이너 성능 수집
리눅스 컨테이너의 CPU, MEMORY, DISK, NIC 성능을 수집합니다. 수집된 성능 정보는 카테고리 server_container에서 확인할 수 있습니다.
echo "container.enabled=true" |sudo tee -a /usr/whatap/infra/conf/whatap.conf
윈도우 서버 서비스 운영 상태 수집
윈도우 서버 서비스 운영 상태를 수집합니다. 수집된 서비스 운영 상태는 카테고리 server_windows_service에서 확인할 수 있습니다.
# 관리자 권한이 필요합니다.
Add-Content -Path "C:\Program Files\WhatapInfra\whatap.conf" -Value "winservice.enabled=true"
파일 감시
파일 시스템상에 존재하거나 존재할 가능성이 있는 파일 및 디렉터리를 감시할 수 있습니다.
- Linux Shell
- Windows Powershell
echo "filecheck.enabled=true" |sudo tee -a /usr/whatap/infra/conf/whatap.conf
echo "감시를 원하는 파일 혹은 디렉터리 전체 경로" |sudo tee -a /usr/whatap/infra/conf/filesystem.conf
Add-Content -Path "C:\Program Files\WhatapInfra\whatap.conf" -Value "filecheck.enabled=true"
Add-Content -Path "C:\Program Files\WhatapInfra\filesystem.conf" -Value "감시를 원하는 파일 혹은 디렉터리 전체 경로"
와탭 에이전트 로그 옵션
로그 위치
와탭 에이전트 로그(whatap_infrad.log, whatap_infra.log, whatap_infrad.fork.stdout.log)의 경로를 변경합니다. 지정 경로가 없는 경우 와탭 에이전트가 생성을 시도합니다. 에이전트 버전 2.0.6 이상 지원됩니다.
- Linux Shell
- Windows Powershell
echo "agent.log.prefix=변경을 원하는 디렉터리" |sudo tee -a /usr/whatap/infra/conf/whatap.conf
Add-Content -Path "C:\Program Files\WhatapInfra\whatap.conf" -Value "agent.log.prefix=변경을 원하는 디렉터리"
윈도우의 경우 경로 구분자를 \\로 입력할 수 있습니다.
로그 출력 조정 옵션
서버 모니터링 에이전트의 로그는 기본적으로 /var/log 경로 하위에 저장됩니다. 아래 옵션을 통해 로그 파일 크기 제한과 백업 파일 개수를 조정할 수 있습니다.
- Linux / Windows
- Unix (AIX, HPUX, Solaris)
- Linux / Windows
- agent.log.size
- 기본값 10, 단위 MB
- agent.log.backupfile
- 기본값 2, 단위 개수
- agent.log.size
-
Unix(AIX, HPUX, Solaris)
- log.size
- 기본값 4, 단위 MB
- log.backup
- 기본값, 3, 단위 개수
- log.size
-
AIX 추가 로그 옵션 (errpt 수집 로그)
- aix.errpt.log.size=4
- 기본값 4, 단위 MB
- aix.errpt.log.backup=3
- 기본값 3, 단위 개수
- aix.errpt.log.size=4
Netstat 모니터링
netstat 명령이 탑재된 경우 1분 간격으로 수집하여 카테고리 server_netstat (netstat connection 통계), server_netstat_s (netstat -s 명령 실행 결과)로 업로드됩니다.
- Linux Shell
- Windows Powershell
echo "netstats.enabled=true" |sudo tee -a /usr/whatap/infra/conf/whatap.conf
Add-Content -Path "C:\Program Files\WhatapInfra\whatap.conf" -Value "netstats.enabled=true"
사용자 스크립트 모니터링
- Linux Shell
- Windows Powershell
리눅스 서버에서 실행 가능한 사용자 스크립트를 주기적으로 실행하여 결과를 업로드합니다. 사용자 스크립트 모니터링 기능은 정해진 주기에 따라 스크립트를 실행하고 그 결과를 수집 서버로 업로드합니다. 30초 주기 간격으로 스크립트를 실행하여 결과를 수집합니다.
데이터는 스크립트 실행이 완료된 시점을 기준으로 수집되며 실행하는 스크립트 내용에 따라 실제 수집 시각과 데이터 반영 시각에는 일부 차이가 발생할 수 있습니다. 다음 예시를 참조하여 사용자 스크립트를 작성하세요.
-
스크립트를 다음과 같이 작성 후 실행하세요.
Linux Shell#!/bin/bash
urls=("https://www.whatap.io" "https://blog.whatap.io" "https://service.whatap.io")
for url in ${urls[*]}; do
echo "M $url url $url"
curl -w @- -o /dev/null -s "$url" <<'EOF'
M %{url_effective} url %{url_effective}\n
H %{url_effective} time_namelookup %{time_namelookup}\n
H %{url_effective} time_connect %{time_connect}\n
H %{url_effective} time_appconnect %{time_appconnect}\n
H %{url_effective} time_pretransfer %{time_pretransfer}\n
H %{url_effective} time_redirect %{time_redirect}\n
H %{url_effective} time_starttransfer %{time_starttransfer}\n
H %{url_effective} time_total %{time_total}\n
EOF
done -
다음과 같이 출력되는지 확��인하세요.
Linux Shell$ ./curl.sh
M https://www.whatap.io/ url https://www.whatap.io/
H https://www.whatap.io/ time_namelookup 0.007289
H https://www.whatap.io/ time_connect 0.010702
H https://www.whatap.io/ time_appconnect 0.033637
H https://www.whatap.io/ time_pretransfer 0.033831
H https://www.whatap.io/ time_redirect 0.000000
H https://www.whatap.io/ time_starttransfer 0.043230
H https://www.whatap.io/ time_total 0.043312
M https://blog.whatap.io/ url https://blog.whatap.io/
H https://blog.whatap.io/ time_namelookup 0.000000
H https://blog.whatap.io/ time_connect 0.000000
H https://blog.whatap.io/ time_appconnect 0.000000
H https://blog.whatap.io/ time_pretransfer 0.000000
H https://blog.whatap.io/ time_redirect 0.000000
H https://blog.whatap.io/ time_starttransfer 0.000000
H https://blog.whatap.io/ time_total 0.005654
M https://service.whatap.io/ url https://service.whatap.io/
H https://service.whatap.io/ time_namelookup 0.004296
H https://service.whatap.io/ time_connect 0.007282
H https://service.whatap.io/ time_appconnect 0.038404
H https://service.whatap.io/ time_pretransfer 0.038607
H https://service.whatap.io/ time_redirect 0.000000
H https://service.whatap.io/ time_starttransfer 0.055226
H https://service.whatap.io/ time_total 0.055307 -
스크립트 정상 수집을 확인하고 다음과 같이 와탭 서버 모니터링 에이전트에 스크립트를 ��등록하세요.
Linux Shellexport USER_SCRIPT=실행할 사용자 스크립트 절대 경로
sudo chmod +x $USER_SCRIPT
sudo mkdir /usr/whatap/infra/ext/
sudo cp -r $USER_SCRIPT /usr/whatap/infra/ext/
export RUNAS_USER=사용자 스크립트를 실행할 계정. root 계정제외
sudo WHATAP_HOME=/usr/whatap/infra/conf /usr/whatap/infra/whatap_infrad --user=$RUNAS_USER init-script
sudo service whatap-infra restart
수집된 데이터는 분석 > 메트릭스 차트에서 카테고리 server_ext_폴더_실행스크립트에서 찾을 수 있습니다.
윈도우 서버에서 실행 가능한 사용자 스크립트를 주기적으로 실행하여 결과를 업로드합니다. 사용자 스크립트 모니터링 기능은 정해진 주기에 따라 스크립트를 실행하고 그 결과를 수집 서버로 업로드합니다. 30초 주기 간격으로 스크립트를 실행하여 결과를 수집합니다.
데이터는 스크립트 실행이 완료된 시점을 기준으로 수집되며 실행하는 스크립트 내용에 따라 실제 수집 시각과 데이터 반영 시각에는 일부 차이가 발생할 수 있습니다. 다음 예시를 참조하여 사용자 스크립트를 작성하세요.
- BAT
- PowerShell
BAT 스크립트 실행
-
스크립트를 다음과 같이 작성 후 실행하세요.
BAT@echo off
setlocal enabledelayedexpansion
set urls=https://www.whatap.io https://blog.whatap.io https://service.whatap.io
for %%u in (%urls%) do (
echo M %%u url %%u
rem Use curl to fetch the URL and get the total time taken for the request
for /f "tokens=*" %%i in ('curl -o nul -s -w "M %%{url_effective} url %%{url_effective}" %%u') do (
echo %%i
)
rem Measure the start time
set startTime=!time!
rem Perform the curl request and measure the end time
curl -o nul -s %%u
set endTime=!time!
rem Parse the start time
for /F "tokens=1-4 delims=:.," %%a in ("!startTime!") do (
set /A "startH=%%a, startM=%%b, startS=%%c, startMS=%%d"
)
rem Parse the end time
for /F "tokens=1-4 delims=:.," %%a in ("!endTime!") do (
set /A "endH=%%a, endM=%%b, endS=%%c, endMS=%%d"
)
rem Calculate the elapsed time in milliseconds
set /A "elapsedMS=(endH*3600000 + endM*60000 + endS*1000 + endMS) - (startH*3600000 + startM*60000 + startS*1000 + startMS)"
rem Convert milliseconds to seconds and milliseconds part
set /A "elapsedSec=elapsedMS/1000"
set /A "elapsedMSPart=elapsedMS %% 1000"
echo H %%u time_total !elapsedSec!.!elapsedMSPart!
)
endlocal -
다음과 같이 출력되는지 확인하세요.
BAT>webcheck.bat
M https://www.whatap.io url https://www.whatap.io
M https://www.whatap.io/ url https://www.whatap.io/
H https://www.whatap.io time_total 0.38
M https://blog.whatap.io url https://blog.whatap.io
M https://blog.whatap.io/ url https://blog.whatap.io/
H https://blog.whatap.io time_total 0.1
M https://service.whatap.io url https://service.whatap.io
M https://service.whatap.io/ url https://service.whatap.io/
H https://service.whatap.io time_total 0.922 -
스크립트 정상 수집을 확인하고 다음과 같이 와탭 서버 모니터링 에이전트에 스크립트를 등록하세요.
BATcd "\Program Files\WhatapInfra"
whtap_infra.exe init-script
sc stop "Whatap Infra"
sc start "Whatap Infra"
PowerShell 스크립트 실행
-
스크립트를 다음과 같이 작성 후 실행하세요.
PowerShell$urls = @("https://www.whatap.io", "https://blog.whatap.io", "https://service.whatap.io")
# Hide progress bar
$ProgressPreference = 'SilentlyContinue'
foreach ($url in $urls) {
Write-Output "M $url url $url"
$startTime = Get-Date
try {
$response = Invoke-WebRequest -Uri $url -UseBasicParsing
$endTime = Get-Date
$timeTotal = ($endTime - $startTime).TotalSeconds
Write-Output "M $($response.BaseResponse.ResponseUri) url $($response.BaseResponse.ResponseUri)"
Write-Output ("H {0} time_total {1}" -f $url, $timeTotal)
} catch {
Write-Output "Failed to access $url"
}
} -
다음과 같이 출력되는지 확인하세요.
PowerShell> .\webcheck.ps1
M https://www.whatap.io url https://www.whatap.io
M url
H https://www.whatap.io time_total 0.376979
M https://blog.whatap.io url https://blog.whatap.io
Failed to access https://blog.whatap.io
M https://service.whatap.io url https://service.whatap.io
Failed to access https://service.whatap.io -
스크립트 정상 수집을 확인하고 다음과 같이 와탭 서버 모니터링 에이전트에 스크립트를 등록하세요.
PowerShellcd "\Program Files\WhatapInfra"
.\whatap_infra.exe init-script
Restart-Service "Whatap Infra"
서버 시간 동기화 모니터링
사전 확인
-
운영체제: 리눅스
-
와탭 서버 모니터링 에이전트 버전: 2.5.4 이상
다음 옵션을 통해 서버 시간 동기화(NTP) 모니터링 기능을 활성화 할 수 있습니다.
echo "ntpq.enabled=true" |sudo tee -a /usr/whatap/infra/conf/whatap.conf
추가 지표 안내
서버 시간 동기화 모니터링 기능 활성화 시 추가되는 메트릭은 다음과 같습니다.
server_ntpq
Tags
| 태그명 | 설명 | 비고 |
|---|---|---|
refid | 해당 리모트(remote)의 시간 동기화 소스를 의미합니다. | - |
remote | 호스트가 시간 동기화를 수행할 대상 서버를 의미합니다. | - |
Fields
| 필드명 | 단위 | 설명 | 비고 |
|---|---|---|---|
delay | ms | 서버가 보낸 쿼리에 대한 응답으로 회신 패킷을 반환하는데 걸린 시간을 의미합니다. | - |
jitter | - | 두 샘플 간의 오프셋 측정 차이로 추정한 오차 경계치를 ��의미합니다. | - |
offset | ms | 서버 설정 시간과 클라이언트 설정 시간 간의 차이를 의미합니다. | - |
poll | second | ntp.conf 파일에서 minpoll 값으로 정의된 원격 호스트로의 폴링 간격을 의미합니다. | - |
reach | - | 서버에 도달하는 시도가 얼마나 성공적인지 확인할 수 있습니다. 2^0 위치에 가장 최근 질의 성공 여부를 기록하고 8 비트 쉬프트 레지스터로 작동합니다. | - |
st | - | 원격 호스트의 스트래텀 레벨을 의미합니다. | - |
sync_client | - | 1: 동기화 서버가 존재합니다. | - |
| 0: 동기화 서버가 존재하지 않습니다. | |||
t | - | 사용 가능한 유형은 다음과 같습니다. | - |
| l : 로컬(예 GPS시계) | |||
| u: 유니캐스트(일반적인 유형) | |||
| m: 멀티캐스트 | |||
| b: 브로드캐스트 | |||
when | second | 원격 호스트 응답 이후 지난 초 수를 의미합니다. | - |
리눅스 시스템 로그 모니터링
리눅스 시스템 로그를 실시간 업로드하여 장애 시 해당 시간에 발생한 로그를 확인할 수 있습니다. 수집 대상 로그 파일은 �다음과 같습니다.
- /var/log/syslog
- /var/log/messages
설정 방법은 다음과 같습니다.
echo "systemlog.enabled=true" |sudo tee -a /usr/whatap/infra/conf/whatap.conf
로그 모니터링 플러그인
임의의 로그를 수집할 수 있습니다. 다음 설정은 에이전트 재시작이 필요합니다.
Linux Shell
-
기본 설치
Linux Shellexport LOGFILES=/some/path/file1,/some/other/file2
echo "logsink.files=$LOGFILES" | sudo tee -a /usr/whatap/infra/conf/whatap.conf -
카테고리와 함께 설치
Linux Shellcd /usr/whatap/infra
sudo mkdir extension
cat <<EOL | sudo tee extension/logsink.conf > /dev/null
[[inputs.logsink]]
category = "serverlog"
## 로그 발생량 통계 별도 데이터로 전송 여부
stats_enabled = true
## 로그 발생량 통계 카테고리
stats_category = "logsink_stats"
## 로그 파일 경로(path)에 별표(*)가 포함되어 제외할 로그 비대상 파일명 설정
excludeNames = [ ".gz",".zip" ]
[[inputs.logsink.file]]
## 로그 파일 지정 시, 날짜 패턴(strftime.org) 지정 가능
path = "/some/path/%Y-%m-%d/.log"
disabled = false
encoding = "euc-kr"
[[inputs.logsink.file]]
path = "/some/other/log"
disabled = false
encoding = "utf-8"
[[inputs.logsink.file]]
## 줄 단위 로그에서 해당 키워드 검색 시, 이전 로그에 병합
nowrap_keywords = ["Caused by:", "Test"]
[[inputs.logsink.file]]
## 프로젝트 코드 및 프로젝트 라이선스 입력 시, 로그를 같은 리전의 원하는 프로젝트로 전송 가능
# pcode = 프로젝트 코드
# license = "프로젝트 라이선스"
[[inputs.logsink.file]]
# whatap_host_ip = "수집 서버 아이피1/수집 서버 아이피2"
# whatap_host_port = 6600
[[inputs.logsink.file]]
path = "/tmp/mixed.log"
disabled = false
encoding = "utf-8"
## [{"A":1,"B":2},{"C":3,"D":4},...] 형태를 각각의 로그로 분리할 수 있다.{"A":1,"B":2} {"C":3,"D":4}
multiline_pattern = "simple_json_array"
EOL
sudo service whatap-infra restart
Windows Powershell
-
기본 설치
Windows Powershell$LOGFILES="c:\\whatap\\logs\\%Y-%m-%d\\*.log,c:\\whatap\\logs\\*.log"
Add-Content "c:\Program Files\WhatapInfra\whatap.conf" -Value "logsink.files=$LOGFILES" -
카테고리와 함께 설치
Windows Powershell# 관리자 권한 필요
New-Item -type "Directory" -Path "C:\Program Files\WhatapInfra\extension"
$contentToAdd = @"
[[inputs.logsink]]
category = "serverlog"
## 로그 발생량 통계 별도 데이터로 전송 여부
stats_enabled = true
## 로그 발생량 통계 카테고리
stats_category = "logsink_stats"
## 로그 파일 경로(path)에 별표(*)가 포함되어 제외할 로그 비대상 파일명 설정
excludeNames = [ ".gz",".zip" ]
[[inputs.logsink.file]]
## 로그 파일 지정 시, 날짜 패턴(strftime.org) 지정 가능
path = "c:\\whatap\\logs%Y-%m-%d_.log"
disabled = false
encoding = "euc-kr"
[[inputs.logsink.file]]
## 줄 단위 로그에서 해당 키워드 검색 시, 이전 로그에 병합
nowrap_keywords = ["Caused by:", "Test"]
[[inputs.logsink.file]]
## 프로젝트 코드 및 프로젝트 라이선스 입력 시, 로그를 같은 리전의 원하는 프로젝트로 전송 가능
# pcode = 프로젝트 코드
# license = "프로젝트 ��라이선스"
[[inputs.logsink.file]]
# whatap_host_ip = "수집 서버 아이피1/수집 서버 아이피2"
# whatap_host_port = 6600
[[inputs.logsink.file]]
path = "/tmp/mixed.log"
disabled = false
encoding = "utf-8"
## [{"A":1,"B":2},{"C":3,"D":4},...] 형태를 각각의 로그로 분리할 수 있다.{"A":1,"B":2} {"C":3,"D":4}
multiline_pattern = "simple_json_array"
"@
New-Item -path "C:\Program Files\WhatapInfra\extension" -name "logsink.conf" -type "file" -value $contentToAdd -Force
Restart-Service "Whatap Infra"
옵션 설정
-
stats_enabled: 수집 현황 데이터의 수집 여부를 설정합니다. (기본값:false)true로 설정해야 하며,stats_category에서 설정한 카테고리(logsink_stats)로 통계 데이터가 발생합니다.
-
stats_category: 수집 현황 데이터를 저장할 메트릭스 카테고리를 설정합니다.logsink_stats로 값을 설정해야 합니다. 통계 데이터 필드는 다음과 같습니다.저장되는 통계 데이터 필드:
filecheckIntervalencodingfileposcheckedLocalTimelastupdatedLocalTimefileSizeerrorfirstChecktransferBytes -
excludeNames: 로그 파일 경로(path)에 별표(*)를 포함한 경우 로그 비대상 파일을 제외하도록 파일명을 설정할 수 있습니다. 쉼표(,)를 구분자로 이용해 복수 설정할 수 있습니다.ExampleexcludeNames = [ ".gz",".zip" ] -
nowrap_keywords: 줄 단위 로그 검색 시 해당 옵션값으로 지정한 키워드가 검색될 경우 이전 로그에 병합합니다. -
pcode: 로그를 전송할 같은 리전의 프로젝트 코드를 입력합니다. -
license: 로그를 전송할 같은 리전의 프로젝트의 라이선스 코드를 입력합니다.
pcode, license 옵션의 경우 서버 에이전트 2.7.4 버전 이상부터 지원합니다.
윈도우 이벤트 로그 옵션 설정
윈도우 이벤트 로그 수집 시 다음과 같이 옵션을 설정할 수 있습니다.
# 관리자 권한 필요
New-Item -type "Directory" -Path "C:\Program Files\WhatapInfra\extension"

$contentToAdd = @"
[[inputs.win_eventlog]]
    category = "win_event_log"
    stats_category = "win_event_log_stats"
    stats_enabled = true
    enabled = true
    [[inputs.win_eventlog.file]]
        #true | false
        enabled = true
        # Application, Security, Setup, System, ForwardedEvents
        file = "Application"
        #1: Information, 2: Warning 3: Error 4: Audit Success 5 Audit Fail
        #event_type =
        #event id
        #event_id =
        #event source name
        #source_name = ""
        #프로젝트 코드 및 프로젝트 라이선스 입력 시, 로그를 같은 리전의 원하는 프로젝트로 전송 가능
        #pcode = 프로젝트 코드
        #license = "프로젝트 라이선스"
        #whatap_host_ip = "수집 서버 아이피1/수집 서버 아이피2"
        #whatap_host_port = 6600

"@

New-Item -path "C:\Program Files\WhatapInfra\extension" -name "win_eventlog.conf" -type "file" -value $contentToAdd -Force

Restart-Service "Whatap Infra"
-
카테고리 지정(
category) 필수예,
win_event_log -
통계 카테고리 지정(
stats_category) 필수예,
win_event_log_stats -
통계 카테고리 On/Off(
stats_enabled) 필수예,
true혹은false -
수집 기능 On/Off(
enabled) 필수예,
true혹은false -
파일별 수집 기능 On/Off(
enabled) 필수예,
true혹은false -
파일(
file) 필수예,
Application,Security,Setup,System,Forwarded -
이벤트 타입(
event_type) 비필수예,
1,2,3,4,5노트이벤트 타입
-
Information
-
Warning
-
Error
-
Audit Success
-
Audit Fail
-
-
이벤트 아이디(
event_id) 비필수 -
이벤트 소스 이름(
source_name) 비필수 -
프로젝트 코드(
pcode) 비필수 -
프로젝트 라이선스 (
license) 비필수
에이전트 지원 버전
-
윈도우 이벤트 로그 수집의 경우 서버 에이전트 2.5.2 버전 이상부터 지원합니다.
-
윈도우 이벤트 로그 옵션 중
pcode,license옵션의 경우 서버 에이전트 2.7.4 버전 이상부터 지원합니다.
로그 다중 파일 지정 및 분리
다중 파일 지정
여러 로그 파일을 동일한 카테고리로 설정하려면, 각 로그 파일 경로를 [[inputs.logsink.file]] 항목에 추가하고, path 설정을 통해 파일 경로를 지정합니다. 또한, category, stats_enabled, stats_category 등의 옵션을 사용하여 로그 발생량 통계 설정과 같은 부가적인 설정을 할 수 있습니다.
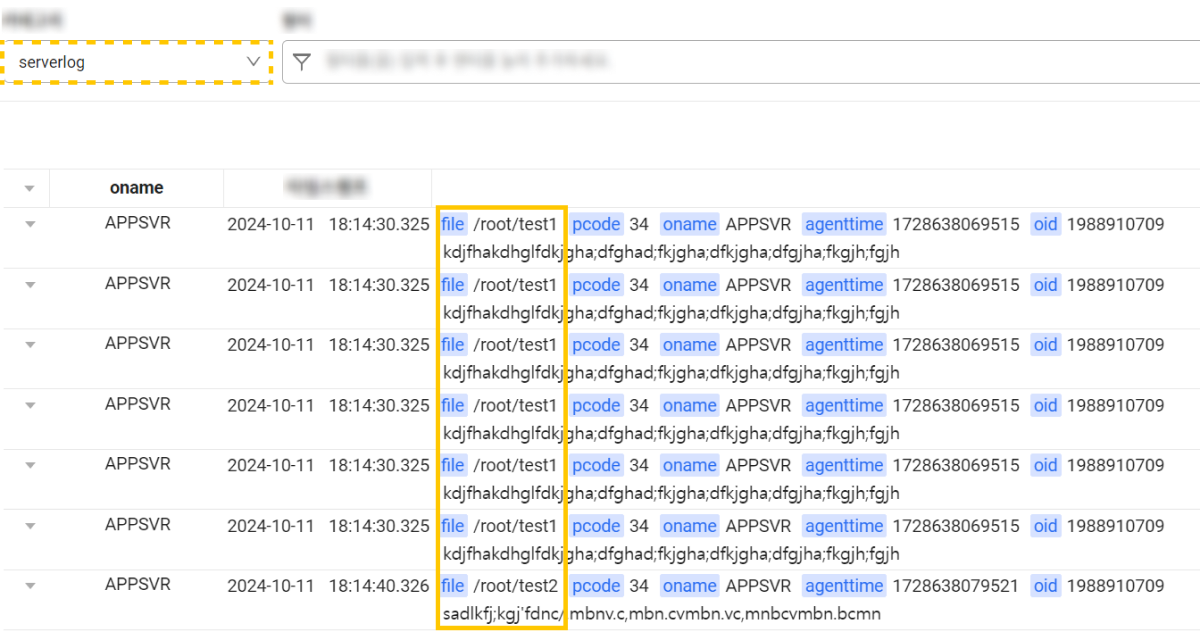
/root/test1 및 /root/test2 파일을 동일한 카테고리(serverlog)로 지정한 예시입니다.
[[inputs.logsink]]
  category = "serverlog"
  stats_enabled = true
  stats_category = "logsink_stats"
  excludeNames = [ ".gz",".zip" ]

[[inputs.logsink.file]]
  path = "/root/test1"
  disabled = false
  encoding = "utf-8"

[[inputs.logsink.file]]
  path = "/root/test2"
  disabled = false
  encoding = "utf-8"
category, stats_enabled, stats_category, nowrap_keywords 등의 옵션에 대한 내용은 옵션 설정를 참고하세요.
해당 예시의 경우 라이브 테일 메뉴에서 다음과 같이 확인할 수 있습니다.
파일 분리
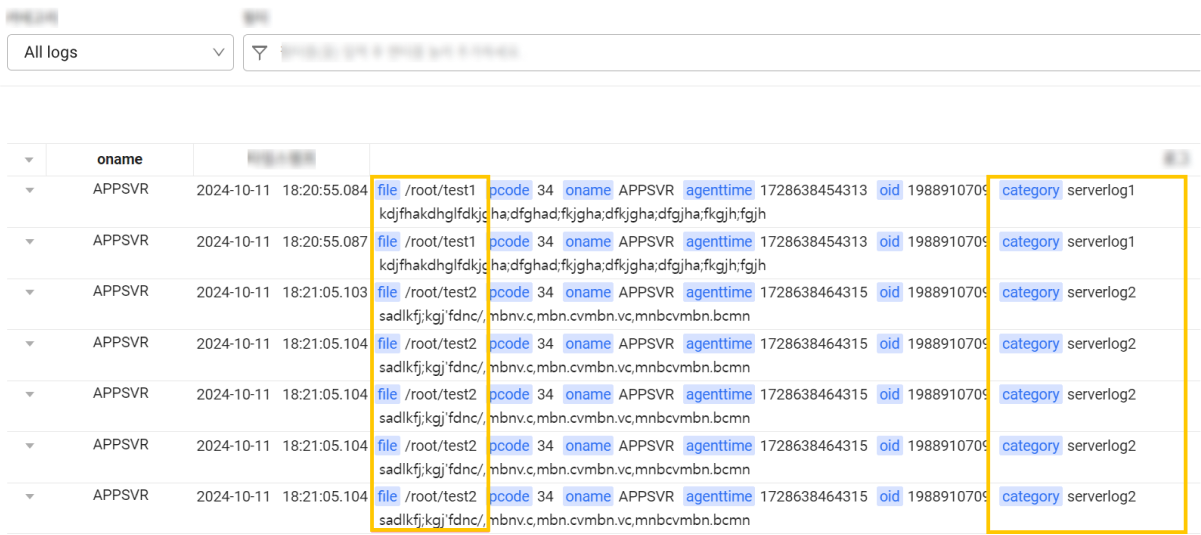
서로 다른 카테고리로 로그 파일을 지정하려면, logsink{숫자}.conf 파일을 각각 생성한 후, 각 파일의 category 항목에 서로 다른값을 설정하세요.
logsink.conf와 logsink1.conf를 통해 서로 다른 로그 카테고리를 설정한 예시입니다.
# cat logsink.conf
[[inputs.logsink]]
  category = "serverlog1"
  stats_enabled = true
  stats_category = "logsink_stats"
  excludeNames = [ ".gz",".zip" ]

[[inputs.logsink.file]]
  path = "/root/test1"
  disabled = false
  encoding = "utf-8"
#cat logsink1.conf
[[inputs.logsink]]
  category = "serverlog2"
  stats_enabled = true
  stats_category = "logsink_stats"
  excludeNames = [ ".gz",".zip" ]

[[inputs.logsink.file]]
  path = "/root/test2"
  disabled = false
  encoding = "utf-8"
category, stats_enabled, stats_category, nowrap_keywords 등의 옵션에 대한 내용은 옵션 설정를 참고하세요.
해당 예시의 경우 라이브 테일 메뉴에서 다음과 같이 확인할 수 있습니다.